Hello World Design
Setting up a basic project
Recap
I had the schematics of the board, so its was time for me to start with a simple hello world project to get my footing in this project.
Setting up the fabric
So I am just going to give the highlights here rather than walking step by step on how I did this. After generating the project for the chip, xc7z020clg484-2, I put together a very basic design that barely utilized the fabric. This design is primarly there to test the processors on the chip and make sure that I can actually talk to the board. I have found that once the processing system on the chip works, adding stuff to the fabric and testing it becomes significantly easier. For me atleast, idk if that is how it really works. Anyways here is the design:
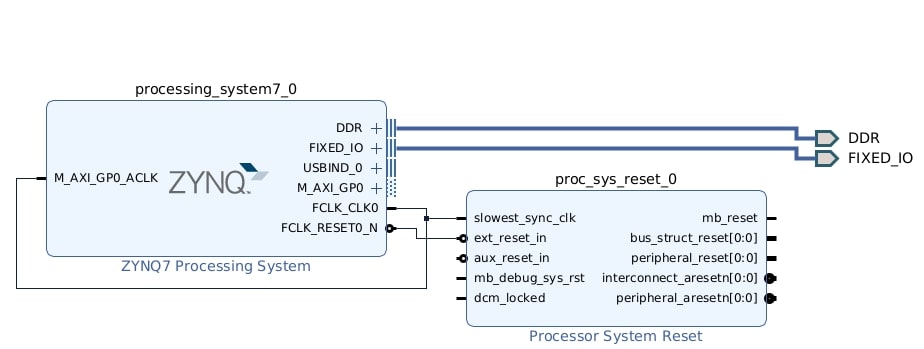 Figure 2: Blcok Diagram
For the processor, I set up the pins and I/O based on the information provided in the schematics:
| I/O | MIO Pin Range |
|---|---|
| Quad Spi Flash | 1 - 6 |
| Ethernet 0 | 16 - 27 |
| USB 0 | 28 - 39 |
| SD Card (SD 0) | 40 - 45 |
| Uart 1 | 48 - 49 |
This synthesized and generated the .xsa file required for the next step no problem!! I also added a reset core there to handle process resetting but I did not really actually use this core all that much since there isn’t actually anything in the fabric for this core to propagate this signal to.
Building the OS
So to keep it simple, I decide to go with linux here instead of using RTEMS or FreeRTOS. Again like with the fabric side, I am really just going to give the highlights, not an end to end tutorial. Though in the future I could write a tutorial, might be worth doing, idk. Anyways, I started with my yocto template and started filling in the pieces I needed.
I started with making a new meta layer for the project, meta-schemium. This layer consisted currently of just the machine file for the custom fabric we had generated from vivado in the shape of a .xsa file.
1
2
3
4
5
6
7
8
9
10
11
12
13
14
15
16
17
18
19
20
21
22
23
24
25
26
27
28
29
30
31
require conf/machine/zynq-generic.conf

FILESEXTRAPATHS:prepend := "${THISDIR}/files:"

HDF_EXT  = "xsa"
HDF_BASE = "file://"
HDF_PATH = "/home/hokusai/schemium/fabric/hardware_handoff/core_wrapper.xsa"

YAML_MAIN_MEMORY_CONFIG:pn-device-tree      = "PS7_DDR_0"

YAML_CONSOLE_DEVICE_CONFIG:pn-device-tree   = "ps7_uart_1"
YAML_SERIAL_CONSOLE_STDIN:pn-fsbl-firmware  = "ps7_uart_1"
YAML_SERIAL_CONSOLE_STDOUT:pn-fsbl-firmware = "ps7_uart_1"

SERIAL_CONSOLES               = "115200;ttyPS0"
YAML_SERIAL_CONSOLE_BAUDRATE  = "115200"

UBOOT_ENTRYPOINT      = "0x200000"
UBOOT_LOADADDRESS     = "0x200000"
KERNEL_EXTRA_ARGS     += "UIMAGE_LOADADDR=${UBOOT_ENTRYPOINT}"


BOOTMODE              = "generic"
UBOOT_MACHINE         = "xilinx_zynq_virt_defconfig"

IMAGE_LINK_NAME       = "rootfs"
BOOTFILE_EXT          = ""
RAMDISK_IMAGE         = "rootfs.cpio.gz.u-boot"
RAMDISK_IMAGE1        = "ramdisk.cpio.gz.u-boot"
IMAGE_LINK_NAME       = "rootfs"
IMAGE_FSTYPES        += "cpio cpio.gz cpio.gz.u-boot tar.gz jffs2 ext4"
I know, I know, it is pretty cringe that I am hard coding the path of the xsa file, but it is just one of those things you have to do with yocto. Wasn’t my rules. Anyways the rest was the standard yocto boiler plate, and with one Make command, everything was done.
While I was figuring out what files were relavent in the output folder, I also had yocto spin up an SDK for software development. I then tossed the generated SDK into the following container so that way I had my cross compiler container setup and good to go!!
1
2
3
4
5
6
7
8
9
10
11
12
13
14
15
16
17
18
19
20
21
22
23
24
25
26
27
28
29
30
31
32
33
34
35
36
37
38
39
40
41
42
# Dockerfile for defining the container

FROM ubuntu:22.04

# Basic packages Yocto expects
RUN apt-get update && apt-get install -y \
    git \
    bash \
    locales \
    build-essential \
    python3 \
    python3-distutils \
    diffstat \
    chrpath \
    cpio \
    vim \
    sudo \
    file \
    wget \
    xz-utils \
    && rm -rf /var/lib/apt/lists/*

# Setup locale
RUN locale-gen en_US.UTF-8

# Create non-root user
ARG USERNAME=schemium-dev
RUN useradd -m $USERNAME && echo "$USERNAME ALL=(ALL) NOPASSWD:ALL" >> /etc/sudoers

# --- Install the Yocto SDK ---
# Copy SDK script into container
COPY petalinux*.sh /tmp/sdk.sh

RUN chmod +x /tmp/sdk.sh && \
    /tmp/sdk.sh -y -d /opt/schemium-sdk && \
    rm /tmp/sdk.sh

# Make sure the sdk environment will be available
RUN echo "source /opt/schemium-sdk/environment-setup-*" >> /etc/bash.bashrc

USER ${USERNAME}
WORKDIR /workspace
So now I had a dev container, sd card with the boot files and everything needed to spin up linux and a workflow chain that gets me from Vivado logic to Cross Compiler Container. All that was left was to put the sd card into the fpga and run it!!
The Brick Wall
Now here is the problem. There is an sd card slot and there is a boot switch, and there is no documentation on what makes the device use the sd card to boot. So I tried every combination and nothing worked. After a break, I later realized that this board uses dfu files to flash into the non-vol memory instead of sd cards and I needed to use the JTAG interface to actually load the code. Now the issue is, I had no example projects or anything to show me how to this so I stumbled around blindly and accidently overwrote the firmware provided by the vendor on the device. Now this is rough cause they have their firmware in that sketchy chinese cloud thing and I could not download it.
Next Steps
The sun ended up setting. With all these barriers due to language and cloud service sketchiness made it so that I could not really move forward. Now I can spend the time to reverse engineer this knockoff board and try and figure out how to make this work, or I can do something potentially way dumber.
I can just make my own knockoff fpga based on this board and then change all the parts that I dont understand with designs used by digilent. Besides if I am doing all just to learn and grow my knowledge, why not just jump straight into the madness rather than simply descending.